
Inserting Tables in Word – how can I insert a table and then edit/format it?
![]() This week’s hint and tip is about how to insert a table into a Word document. It also covers some formatting that you can apply once the table is inserted. This is on our Intermediate Word training course and it covers where this option is found and how to use it. We are going to go through it now below.
This week’s hint and tip is about how to insert a table into a Word document. It also covers some formatting that you can apply once the table is inserted. This is on our Intermediate Word training course and it covers where this option is found and how to use it. We are going to go through it now below.
Inserting a table in Word
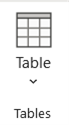
The option to insert a table in Word is found on the Insert Tab. To use it, click on the Insert Tab at the top and then along the ribbon you can click on the button called Table.
From here there are two ways in which you can insert a table into the Word document.
 First way – via Insert Tab, ‘grid boxes’
 First way – via Insert Tab, ‘grid boxes’
The first way to insert a table is by using the ‘grid boxes’ that appear once you click on the Table button. As you hover your mouse over these boxes, you will be able to see a preview of your table behind in your document. There is a 7×6 limit to the size of table you can create via this method.
Once you have decided on the table size, you can click on the box and it will insert the table into the document. From here you can then format and edit your table.
Second way – via Insert Tab, ‘Insert Table’ option
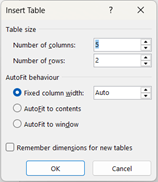 A second way in which you can insert a table into the Word document, is via the Insert Table option that appears under the grid boxes. This option allows you to type in the number of columns and rows you require.
With this way, there is no limit to the table size you can create. After you have typed in the size you require, click OK and it will insert it for you.
Once inserted, you can then use the options available to edit and format your table.
Editing/formatting the table
When you click on your table, two extra tabs will appear at top of your screen. These are Table Design and Table Layout. These two tabs can then be used to format and edit your table.

The Table Design tab has all the formatting options for the appearance of the table. These include colours and borders and also the option to use built in Table Styles.

The Table Layout tab has the editing options for altering the actual table itself. These include options like inserting and deleting rows and changing text directions.
As well as using this tab, you can also insert rows or columns from the table itself. If you hover your mouse over the end of the line in your table a plus in a circle will appear. Click on this and a row or column will be inserted.

To delete rows or columns, first select the row or column you do not need. Next click on the Delete option on the ribbon or by right hand clicking.
The video below shows you how to insert a table into a Word document and also how to edit and format it after. Inserting tables into your Word document is a great way to help summarise information.
Take a look below at the video to find out more and then try it out on your own computer!
We hope you have enjoyed this hint and tip on inserting tables in Word. Why not take a look at our previous one on how a between symbol can be created through formulas in Excel?