
Word Basics Watermarks – how do I insert a watermark in a Word document?
![]() There are lots of features that you can use in Word when creating documents, with some being used more frequently than others. One of these features that is sometimes overlooked is a watermark. This is often a feature that people have seen in documents that they receive or know about it but have never actually used it themselves. This is covered in our Intermediate Word training course.
There are lots of features that you can use in Word when creating documents, with some being used more frequently than others. One of these features that is sometimes overlooked is a watermark. This is often a feature that people have seen in documents that they receive or know about it but have never actually used it themselves. This is covered in our Intermediate Word training course.
This hint and tip is going to go through step by step how to insert a watermark in to your Word document.
Steps
To begin with make sure that you have the document that you want the watermark to be inserted in open, or if you are practicing just have a blank document open.

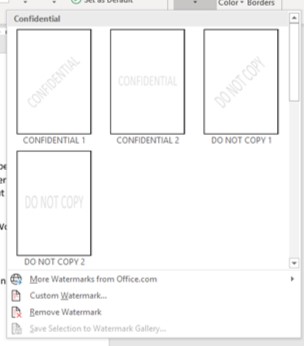 From here go to the Design Tab where you should be able to see the Watermark option. Click on this button and a drop down menu will appear with options that you can choose from. You will be able to see that there are a number of watermarks that you can choose from that are already set up for you. To add any of these to your document, all you have to do is click on the one that you want.
There are also options for a custom watermark. These are either to have a text watermark with any text of your choosing, or you can also have a picture watermark.
To use these options, select the ‘Custom Watermark…’ option on the drop down menu. This will bring up a pop up window with the options you can choose from.
Picture Watermark
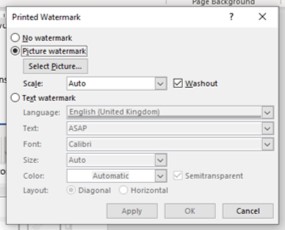 To insert a picture watermark, click on the circle next to ‘Picture watermark’ and the options will be able to be selected. From here click on ‘select picture’ and browse through your filing system to locate the picture that you wish to use and click Insert. Leave the scale set to Auto and also the tick box for ‘Washout’ ticked. Now click OK. This will now have inserted your picture watermark in to your document.
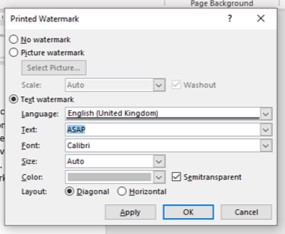
Text Watermark
To insert a text watermark, click on the circle next to ‘Text watermark’ and the options will then become available to be altered. From here you can picture some text from a list or you can type over the text that is already in the box with any text of your own. You can also alter the font type here too. Leave the scale set to Auto as this will automatically adjust the size for you and also leave the option for semi-transparent ticked. You can however change the colour of the font if you wish as well as the layout of the watermark, whether it is displayed diagonally or horizontally.
If you liked this hint and tip on Word Basics Watermarks, then let us know! If you have enjoyed this hint and tip, why not take a look at our previous one on inserting pictures in PowerPoint?