Word Basics Bullet Points – how do you insert them again?
This week we are looking at bullet points in Word and how you can use them in your documents. This is covered in our Basic Word training course.
What are they?
Bullet points can be used for a number of reasons in a document, from creating a list of instructions to summarising information in an easier to read format.
You can insert bullet points before or after you have typed in your information for the bullet points, in this hint and tip we are going to show you how to do both.
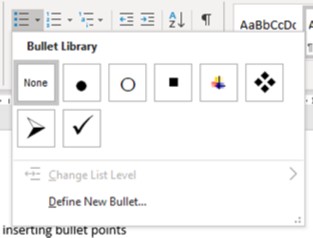
 The bullet point button is found on the Home Tab and there are 2 parts to this button. The main part just inserts a plain bullet point, or the last bullet point style you have chosen, and the second part is a drop down arrow that gives you more options for inserting a bullet point with different styles to choose from and then option to create your own bullet point (which we will look at next time).
Inserting bullet points before typing text
To insert a plain bullet point on a blank ‘line’ in your document, click on the main part of the bullet point button. This will insert a black plain bullet point and you can then start typing in the information that you want with bullet points. Once you have typed in a line of text you can get your next bullet point up by hitting the enter/return key on your keyboard. We will cover how to remove bullet points further down.
Inserting bullet points after typing text
You might already have your list of information typed in and want to insert bullet points to it, which can be done. Firstly, select the information that you want to have bullet points in, then once selected click on the bullet point button. It will now have inserted bullet points into your document. It will insert a bullet point at each time you went to a new row in your document.
Removing bullet points
There are a few ways to do this. Once you have finished your last bullet point line of text, hit enter so that you are now on a new line with a bullet point. From here you can then:
- Click back on to the bullet point button and it will remove it
- Hit enter again and it will remove the bullet point
- Use the backspace key on your keyboard to get you back to ‘normal text’ in your document (you might have to hit it a few times until you are back to the side of the page in Word)
You can also remove more than one bullet point at once, just select all the text that has bullet points currently and then click on the bullet point button. This will have removed the bullet points and changed your text back to ‘normal’ text.
We hope you like this hint and tip on Word basics inserting bullet points and make sure to look out for the next one on defining a bullet point!
If you liked this hint and tip, why not take a look at our previous one on BODMAS?
