
Word Document Protection – using features to protect part of your documents from being edited, have you done this before? Watch the video to learn more
![]() This week’s hint and tip is on Word documents protection. In this hint and tip we are looking at a way in which you can protect just part of your Word document so that only part of it can be edited. This topic is covered in our Intermediate Word training course but we decided to do a hint and tip on it as well. We are going to go through it now below.
This week’s hint and tip is on Word documents protection. In this hint and tip we are looking at a way in which you can protect just part of your Word document so that only part of it can be edited. This topic is covered in our Intermediate Word training course but we decided to do a hint and tip on it as well. We are going to go through it now below.
Styles to use in Word Documents Protection
In this blog we shall look at protecting documents in Word. We shall focus on Styles and protecting those whilst allowing other people sharing this document to be able to change the text in Normal Style and add text using the Normal Style. The Normal Style in Word is the default style used by most people when writing letters and documents in Word. Other Styles like Headings are used when you wish to apply subsequently Table of Contents and Multi Level lists etc.
How to set up the Document to Protect it
These are the steps to go through and a video of this procedure can also be watched below.
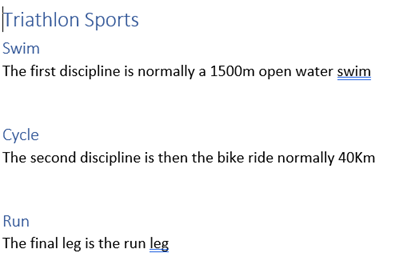
- Type your document using Headings where required. It is the Headings which will be protected. See below example
- Then we use the Developer Tab, Restrict Editing command button
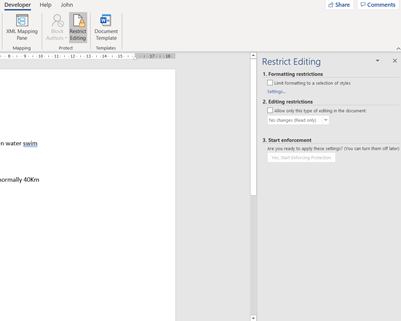
Setting up the Restrict Editing Settings
There are some steps to go through on the right hand pane.
- Tick the box on Formatting Restrictions and then choose Settings. Deselect all and then Choose Normal (Indent)
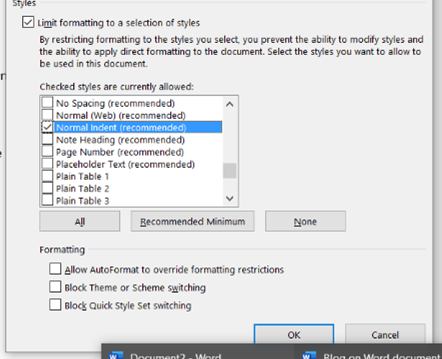
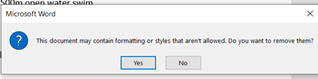
- Press Ok and Say No to the next message (we want to keep the Heading Styles although not to change them)
- On Step 2 you will select the Normal parts of the document you want others to change (Use the control key for multiple selections)
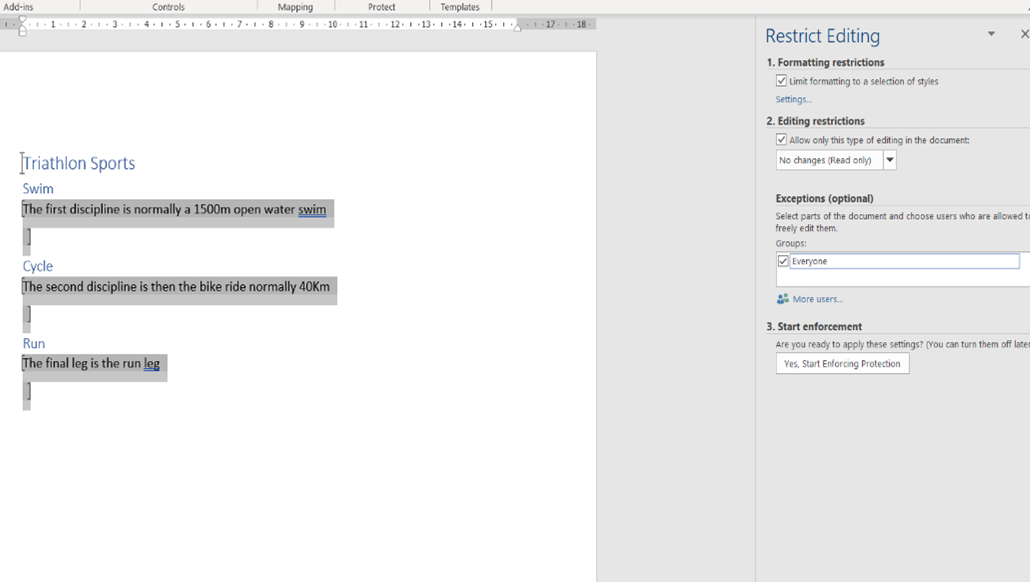
- The last step is to enforce protection with a password.
So, the document is now protected around the Style areas of Headings 1 and 2 but not around the Normal style paragraphs!
For more details on Word documents and Styles visit our web site. Here you can look at the content of our Intermediate and Advanced Word courses.
The video below shows you how you can use these protection options to stop parts of your documents from being edited. You might have heard of this option before or this might be new to you!
Take a look below at the video to find out more and then try them out on your own computer!
We hope you have enjoyed this hint and tip on Word document protection. Why not take a look at our previous video hint and tip on part 1 of Word Shortcuts?