
Inserting Shapes in PowerPoint – how do I insert a shape into a slide in my presentation?
![]() This week’s hint and tip is on inserting shapes in PowerPoint. When you are creating your presentations, you want them to be interesting and so need more than just text in them! There are a number of options that you can insert into your presentations with shapes being one of them. How to do this is covered in our Basic PowerPoint training course but we also decided to do a hint and tip on it. We are going to go through them now below.
This week’s hint and tip is on inserting shapes in PowerPoint. When you are creating your presentations, you want them to be interesting and so need more than just text in them! There are a number of options that you can insert into your presentations with shapes being one of them. How to do this is covered in our Basic PowerPoint training course but we also decided to do a hint and tip on it. We are going to go through them now below.
Inserting a Shape
Shapes are a great way of adding something a bit different to your presentation slides, so that it isn’t just text on them. There are quite a few different shapes you can insert into your slides and there are also a few ways in which you can do it. We are going to go through them all now.
 First Way – Using the Home Tab
The first way in which you can insert a shape is from the Home Tab.
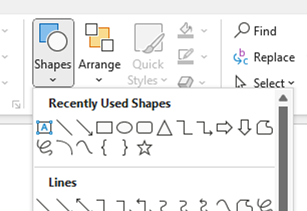
On the Home Tab on the right hand side there is a Drawing gallery. In this gallery there is a Shapes button. Clicking on this button brings a drop down menu with all the different shapes that you can insert.
Select from this menu the shape that you want. Clicking on the shape will then allow you to draw this shape on your slide using your mouse.
Once you have drawn your shape out, letting go of your mouse button will then insert the shape into your slide. From here you can then move the shape to wherever you need or want it on your slide.
 Second Way – Using the Insert Tab
 Second Way – Using the Insert Tab
The second way that you can insert a shape is from the Insert Tab.
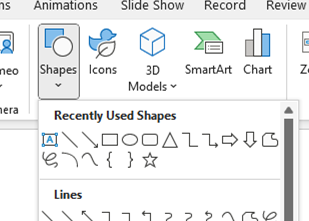
On the Insert Tab there is an Illustrations gallery. In this gallery there is a Shapes button. This is the same button as found on the Home Tab in the first way mentioned above. From here you can click on the button as done previously to see the selection of shapes to choose from.
The rest of the steps to insert the shapes are the same as previously. By clicking on the shape, this will allow you to draw the shape onto your slide.
Once the shape is inserted, you are able to then move it to whatever position you want it on your slide.
Third Way – On the Shape Format Tab
 Third Way – On the Shape Format Tab
Finally the third way of inserting a shape is from the Shape Format Tab.
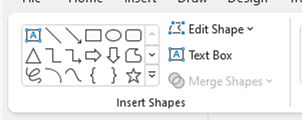
This tab only appears at the top when you have a current shape selected on your slide. When you have an existing shape selected, on the tab there is an Insert Shapes gallery.
From here you can select the shape from the box. To view more shapes, either click on the down arrow to cycle through the rows or click on the bottom arrow to see them all.
Once selected, same as the previous two ways, you can then draw the shape on your slide and then move its position to wherever you want it to be.
The video below shows you how to insert shapes using these three different ways in your PowerPoint presentations. Shapes are a good way of adding something to your slides to go alongside any text you have.
Take a look below at the video to find out more and then try them out on your own computer!
We hope you have enjoyed this hint and tip on inserting shapes in PowerPoint. Why not take a look at our previous video hint and tip on using a nested VLOOKUP function in your spreadsheets in Excel?